There are two ways to configure an EyeAllow & Access200. Users may access the device via a web browser, or using the available on-screen interface (limited functionality).
Using a web browser:
1. Getting Started:
Here, you can customize the reader’s name/label to fit your system or usage (ex: Entrance A, Office 1, Test Center II).
2. Access Control:
There are a few options that can be set: Facility code, Wiegand to ACS panel, Wiegand from card reader, and Relay Output. You can set a facility code to restrict access to certain users. You may also have a Wiegand signal sent to the Access Control System panel. You can also designate a relay duration as well:
3. Account:
In this section, you can set/change the administrative password.
4. Caching: This device is capable of storing a local cache of people it has recently authenticated and will manage the cache on a first-in, first-out basis. Keeping a local cache will improve the performance of the system in most cases and helps keep this device operational in the event of a network loss. In addition to the above, you can also synchronize categories of people to permanently pin them to the local cache. These people will count against the above capacity.
5. Certificates:
Here, the certificate details (subject, issuer, expiration date & time, and the method of signature) are displayed, with the option of uploading a new one.
6. Display and Feedback:
You can configure the display based on device states: Access Granted/Denied, No Match, & Idle. You can upload/set custom images (JPEG, PNG, BMP, or animated GIFs up to 0.5 MB) for any of the states.
7. Location:
Entering this information helps group devices by their physical location. By clicking “Select Location”, you can enter specific attributes, including the location name. GPS details (latitude, longitude, elevation) are optional.
8. Mode (a brief overview, more details can be found in these articles: User Identification Modes, Manually add a person to the Identity Server, & Configuring automatic enrollment on the Access200™).
There are two modes available to use: Enrollment or Identify. Enrollment mode should be selected when the user can be configured to allow you to enroll to either an Identity Server (enrolls the person's face and irises to the IDS) or to a card (enrolls the person's face and irises to a smart card). You can also toggle on contactless enrollment (either operator or card initiated).
Identify Mode can be configured to allow you to customize the type(s) of identification required for access. You can select from either Biometric Only (using the person's biometrics to grant access), Biometric or Card (use either biometrics or card read to grant access), Biometric and Card (confirm the cardholder's identity using their biometrics before granting access), & Biometric on Card (Use biometrics on a smart card to grant access). We also have the option of allowing authentication type: Iris only, Face only, and Iris or Face.
There are also additional settings which can be activated (based on the device application):
- Auto-Capture when someone is close to the device
- Auto-Enroll irises after successful identification
- Enroll presented card credential to person with biometrics
- Enroll presented biometrics to person with card credential
- Require FeverWarn to confirm temperature
- Require PIN entry to confirm identity
- Require TouchNet to confirm meal plan
- Require time and attendance reporting
9. Network:
Network details are displayed, and settings can be configured. Note that although both are supported, DHCP is preferred over static IP configuration.
10. Proximity Sensor
The device's proximity sensor's sensitivity values can be adjusted here. There are a total of five levels (Far, Normal, Close, Very Close, & Extra Close) available for configuration. Once enabled, the device can now capture users at the set distance range.
11. Time:
Time settings can be configured. You can choose to have it automatically set based on NTP (Network Time Protocol) using a time server (host or IP address based), or manually. Note: This server will preferentially use NTP time whenever possible. The manual time setting will be overruled if this server is able to reach an authoritative time source.
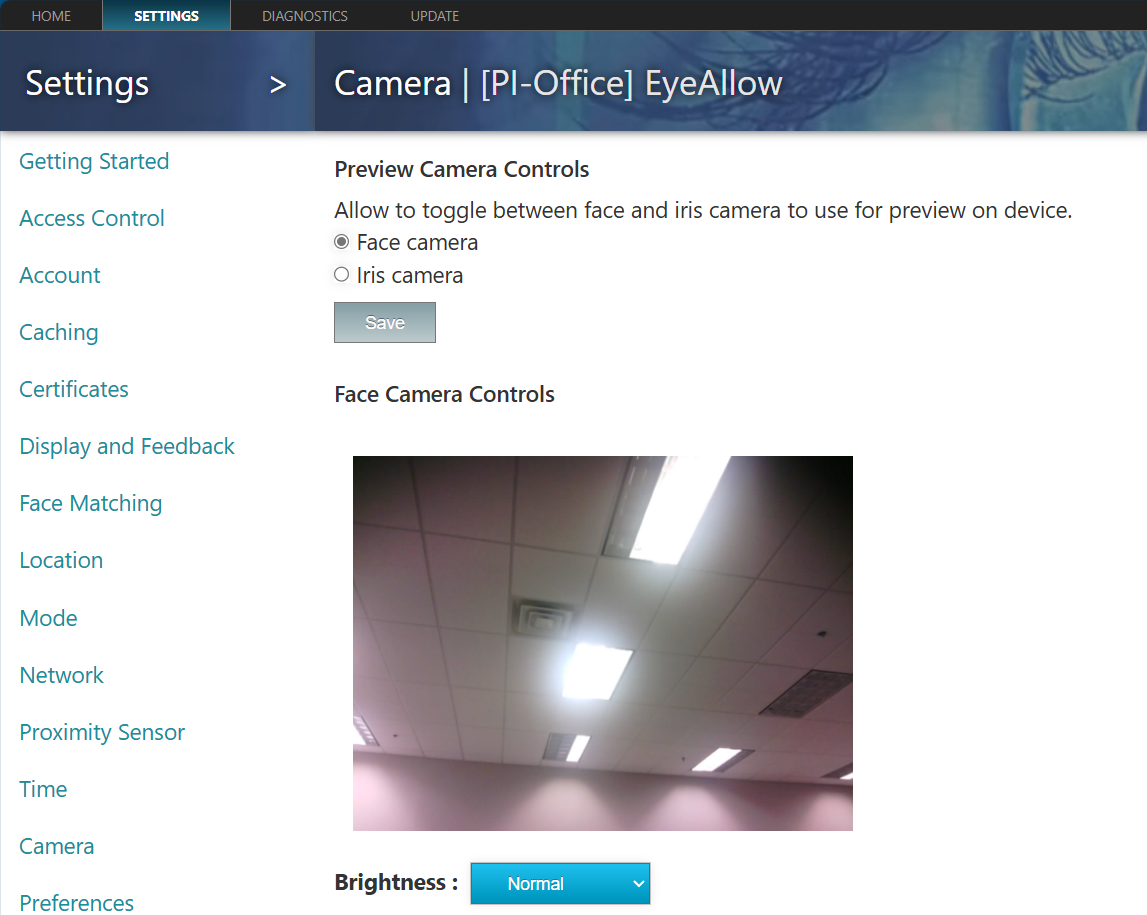
12. Camera: This setting will display a live preview of the device's camera. You can also configure which camera (face or iris) to use during an encounter, and the brightness level of the face camera. Brightness levels range from Extra Dim to Extra Bright.
13. Preferences: Unauthorized requests are disabled by default. Here, you can enable the device to trust the local host/machine for authentication. You can also change the device's log level (set to Info by default, Debug enables more detailed ones for better analyzation).
14. Reader: This section will display the device's internal card reader details (if equipped) and allow you to install the reader's specific firmware.
Restore Default Settings: Starting with version 2.34.0, we now offer you the ability to restore the device back to the default configuration. This will abandon all current settings and reset the device to factory settings while keeping the software and firmware installed:
Using the on-screen settings:
This method is helpful in the event of a user being unable to reach a computer, having issues with wireless access, or can't reach a browser, etc.):
Under the Settings button, Network, Sensors, Wiegand, Device, & Server are listed:
Under "Network", you can configure the network settings for the device. You can choose between two options; a static connection or DHCP:
Under "Sensors", you have 3 configurable options: adjustment of the settings for the face camera (calibration), iris (focus), and the proximity sensor (calibration):
Under "Wiegand", you have 3 options: send a test signal to assess functionality, monitor incoming signals from the card reader, or test loopback functionality (using a loopback cable connected to the Wiegand in/out ports):
Under "Device", you have 3 options: About, Restart, & Factory Reset. About lists the device details (model name/type, device label, host ID, Serial number, and MAC address. Restart allows you to immediately reboot the device. Factory Reset will fully reset the device to the initial configuration (erasing all custom settings, while restoring the factory versions of both the firmware and software):
Under "Server", you have the option to connect the device to an Identity Server Cloud: