When setting up the virtual IDS appliance using VirtualBox a few steps are required to configure the virtual machine before it can be used.
First, follow directions from VirtualBox to deploy the provided OVF template. Those directions can be found here for VirtualBox v6.1: https://docs.oracle.com/en/virtualization/virtualbox/6.1/user/Introduction.html#ovf-import-appliance
Make sure that the appliance has the appropriate network adapter selected and outbound access to the internet.
Once the VM has been imported select the "ids-appliance" virtual machine and click the green arrow "Start".
Once the machine starts, the green arrow will say "Show". Click on this to open up the machine, if it is not already open.
If the system displays warnings pertaining to "Auto capture keyboard" and that the VM "does not support mouse pointer integration" these should be dismissed.
Wait for the machine to load and then press Enter on the terminal (loading make take a few minutes). This will then display the text:
Ubuntu 18.04.5 LTS ids-appliance tty1

ids-appliance login:
Enter the username "idsadmin", press Enter, and on the next line enter the password "password".
Now enter the following into the terminal to install the net-tools:
sudo apt install net-tools
Enter the password "password" when prompted. Wait for the package installation to complete. (Note: "Processing triggers for man-db (2.8.3-2ubuntu0.1)" may take a few minutes)
Now enter the following into the terminal:
sudo nano /etc/default/grub
Enter the password when prompted.
In this file, look for the line with the text
GRUB_CMDLINE_LINUX=""
It is approximately 10 lines into the file - it's the 6th line that does not start with a "#" symbol.
Navigate to that line using the keyboard and add text between the quotation marks to change this line to read:
GRUB_CMDLINE_LINUX="net.ifnames=0 biosdevname=0"
Once that is entered, press Ctrl+O and then Enter to save the file, then Ctrl+Z to exit the editor.
Next enter the following into the terminal to have the configuration file modified. (Note: do not restart the machine between the prior step and this step):
sudo update-grub
Wait for this process to complete. Then type the following into the terminal to restart the machine:
reboot
Wait for the machine to restart.
After it has restarted, reenter the username and password to log in to the system.
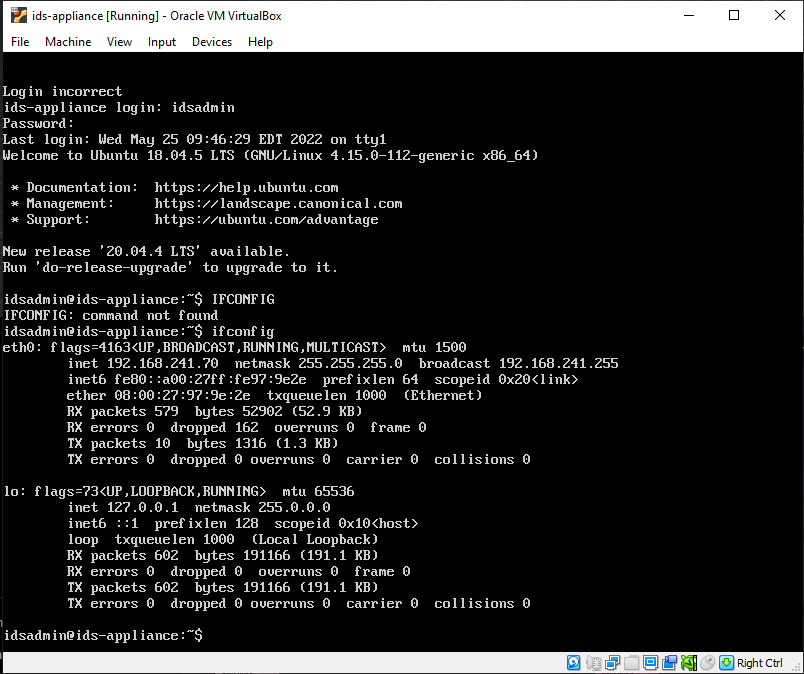
Type the following into the terminal to determine the IP address of this machine:
ifconfig
In the output the IP address will be listed under eth0 on the line that starts with inet (the 2nd line of the output). In the screenshot below the IP address is 192.168.241.70
Now that we have configured the system and determined its IP address, we can close the appliance.
Now using a web browser with network access to the virtual machine enter the IP address and the port into the URL bar.
https://<IP-address>:8443
For the screenshot above, this would look like
https://192.168.241.70:8443
You can now follow the guide on how to Deploy a Virtual IDS appliance.
On VirtualBox the machine can be ran without the need for the machine's UI to be open. To return to this configuration, close the machine window and "Save the machine state".
Using the drop down next to "Start" select "Headless start".